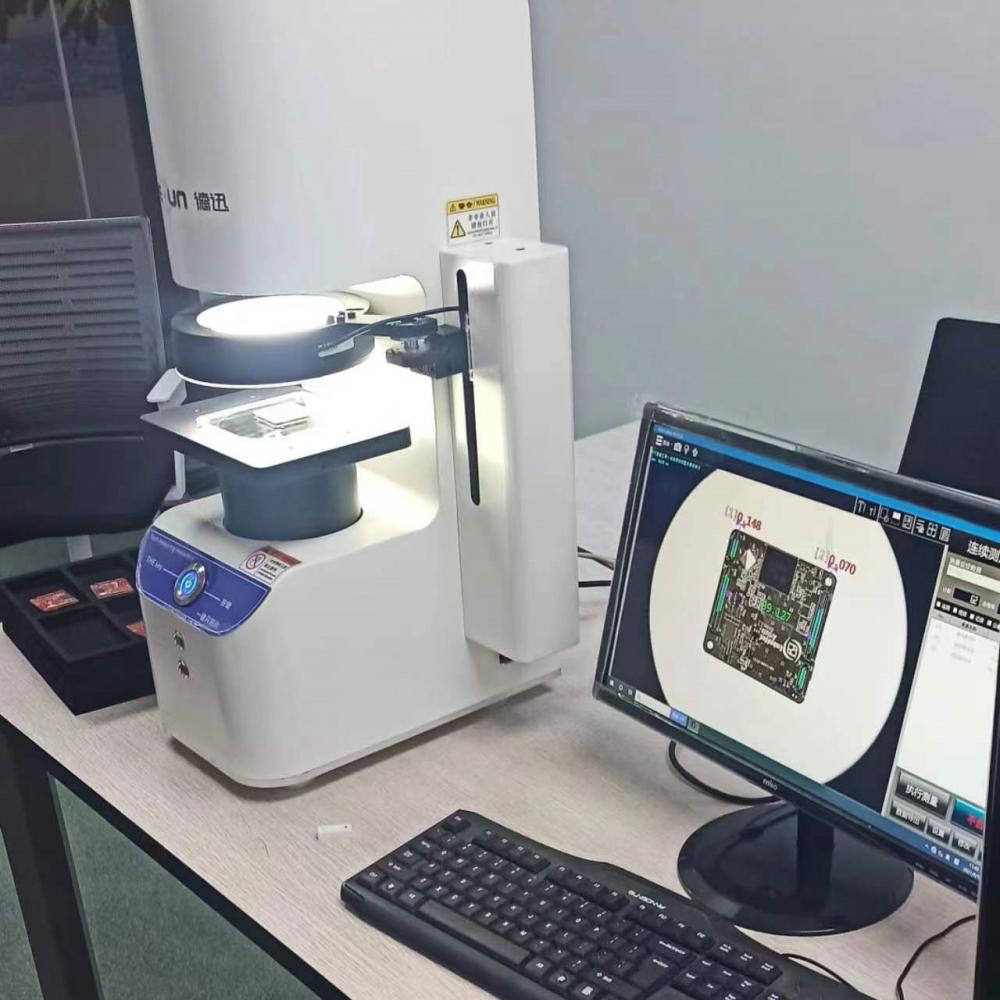
High Precision Fast Detector
$16000≥1Set/Sets
| Payment Type: | T/T,D/P,D/A,L/C |
| Incoterm: | CFR,CIF,EXW,FCA,Express Delivery,FOB |
| Min. Order: | 1 Set/Sets |
| Transportation: | Ocean,Express |
| Port: | Ningbo Port |
$16000≥1Set/Sets
| Payment Type: | T/T,D/P,D/A,L/C |
| Incoterm: | CFR,CIF,EXW,FCA,Express Delivery,FOB |
| Min. Order: | 1 Set/Sets |
| Transportation: | Ocean,Express |
| Port: | Ningbo Port |
Model No.: DX-200
Brand: DEXUN
Certification: Reach, Scoc
Support Customization: Obm, Odm
Place Of Origin: China
Size: 200*180*60
The fast flash tester system is a Measuring Instrument with an excellent performance-price ratio of similar products. It fills the gap between traditional precision measuring instruments and measuring machines. In particular, it can meet the requirements of industrial production for high-performance measurement products. A precision linear guide rail is adopted to reduce the moving error of the workbench. The images are seamlessly connected by moving the worktable to take photos. During the batch measurement process, the pictures of different images can be perfectly spliced by taking a single image field of view product images. The accuracy of the measuring machine can reach micrometers. Amazingly, the operation is straightforward, even if the operator is unfamiliar with the measurement operation. The measuring software used by the measuring machine Zhuoxin Intelligent professional one-click software has a user-friendly interface operation mode, and the operator can measure complex workpieces after using it for several hours. Choxion one-click measurement software
1) The software is calibrated by surface compensation, and the repeated precision of the measurement standard parts can reach 0.003mm, and the repeated measurement product precision can be guaranteed to be<0.005mm;
2) The basic settings of the software (such as calibration data, camera parameter settings, light source settings, and scale parameters) are saved in the config file. They can be used directly without the need for the customer to make complicated settings in the early stage.
3) The programming is simple, similar to the operation mode of anime manual measurement. After the programming is completed, it is directly registered and saved as the product name, and the path can be saved according to the customer's intention. When calling the program, click the programming name, and the picture area will display the photos of the corresponding program products so that the customer can identify whether it is the program to be called. In addition, the "search" function is added. Enter the program name in the search area. The software will gradually find the corresponding program according to the input text. In addition, the saved program will not be unavailable due to software or computer changes. After replacing the computer or reinstalling the software, the previous program can be used without any settings.
4) The software measurement function is powerful. In addition to the primary line drawing, distance, angle, radius, and diameter measurement, it also adds the tasks of finding the highest point, intersection point, contour scanning, electronic caliper, area, profile, longest distance, shortest distance, center distance, etc.
Choxion one button measurement software
1) The function of programming different regions of the same product is added. After the same product has been programmed, six region names such as the top, left, and right can be saved in its subdirectory. You can call a program to measure different regions of the same product, or even place the same product into different regions on the instrument workbench, and then directly call the domain programs under the subdirectory, The software can then measure accordingly.
2) The programming is simple to modify. If the previously programmed program has problems or the product has changes, you can call out the program, click the "Edit" function key to modify the program, and then click "Save" after modification.
3) The report function is powerful, and the product tolerance can be set to automatically judge whether it is qualified or unqualified; CPK analysis can be conducted; You can save the set common tables in Public Reports and call them directly when you use them; You can import the EXCEL parent table made by the customer into the report, directly output the measurement data to the specified cell and get the analysis in the report. The report is saved in PDF, DOC, XLS, TXT, etc.
4) A variety of lighting sources can be selected, so that the range of measurable products is wider: in addition to the standard 100 * 100 flat light (the current one button commonly used transmission light lighting on the market), the backlight can be equipped with a parallel far core light source; In addition to the standard 360 no dead angle LED shadowless lamp, the upper lamp can also be equipped with coaxial light and low angle light to comprehensively solve the lighting light required for various product measurements.


6) Choxion professional one button measurement software is adopted, which has powerful functions and intuitive operation. With the testing and adjustment of domestic software engineers, the software operation is more humanized; And we promise that we can modify the corresponding software according to the measurement requirements proposed by customers.


Privacy statement: Your privacy is very important to Us. Our company promises not to disclose your personal information to any external company with out your explicit permission.

Fill in more information so that we can get in touch with you faster
Privacy statement: Your privacy is very important to Us. Our company promises not to disclose your personal information to any external company with out your explicit permission.